
Since it has been a while since my last blog, I thought I would treat you to my first tutorial! One craft I loved when I was paper crafting a lot was origami, and tea bag folding follows similar techniques to create pretty rosettes!
Tea bag folding got its name as it was originally done with the little "envelopes" that tea bags came in, as these were usually decorated papers which looked lovely as rosettes. Nowadays, these envelopes are more rare, but this technique can be done with any paper. Only one side of the paper will show, so do not worry if the paper you have is only decorated on one side.

You Will Need:
* 8 squares of paper (all the same size)
* Glue
1. Take one of the squares, and fold it in half horizontally, decorated side inwards. Unfold.

2. Now fold diagonally, decorated side outwards, and unfold. Repeat on the other diagonal.
 3. Your square should now have folds as below. Push inwards at the points indicated, the folds you have made should mean the paper folds easily into a triangle, as shown.
4. Take the bottom right corner of the top layer, and fold it up in between the layers to the top point, as shown in the picture.

5. Do the same with the bottom left corner. Your piece should now look like this.

6. Repeat the above steps with the other 7 squares.
7. Now we can create the rosette! Take one of the pieces, and hold it with the right angle pointing downwards.
Lift the right hand side of the top square layer, and dot some glue on the triangle layer (although I would suggest ensuring you know how the pieces will sit together before gluing!), under where the square was. Don't put the top layer down yet!
Take a second piece and, with the right angle pointing towards the centre of the rosette, slide the triangle layer of the first piece in between the top and bottom layers of the second piece. Press down. This should look like the picture below.

8. Now add the third piece in the same way, working clockwise.

9. Continue adding the pieces in the same way until you get to the last piece.


 10. This one is slightly more tricky! Add the final piece as you have been doing before, keeping it on top of the first piece. To finish off, you now need to lift the right hand side of the top square layer, and dot some glue on the triangle layer as before. Now carefully lift the square layer from the first piece, and slot the triangle layer of the final piece underneath it. Press down first the square from the first piece, then the square from the final piece.


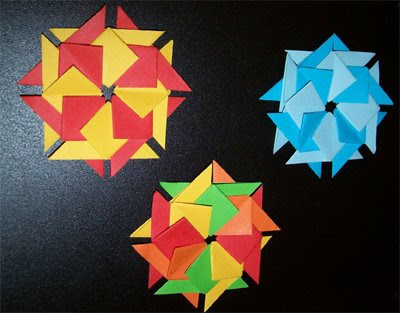
Voila! A finished rosette!
You can experiment with different papers and colours to create a variety of effects. Have a go!
There are many different types of folds for tea bag folding, if you have enjoyed this one and wish to learn more, let me know! I will happily make further tutorials for different folds if there is demand for it!
Lift the right hand side of the top square layer, and dot some glue on the triangle layer (although I would suggest ensuring you know how the pieces will sit together before gluing!), under where the square was. Don't put the top layer down yet!
Take a second piece and, with the right angle pointing towards the centre of the rosette, slide the triangle layer of the first piece in between the top and bottom layers of the second piece. Press down. This should look like the picture below.

8. Now add the third piece in the same way, working clockwise.

9. Continue adding the pieces in the same way until you get to the last piece.


Voila! A finished rosette!
You can experiment with different papers and colours to create a variety of effects. Have a go!

There are many different types of folds for tea bag folding, if you have enjoyed this one and wish to learn more, let me know! I will happily make further tutorials for different folds if there is demand for it!
1 comment:
Good post.
Post a Comment